Saturday, October 12, 2013

Now Available: Fennec Fox

This pattern is now for sale for $5.00 USD through Ravelry.
Materials & Tools
125 yards worsted weight yarn
1 pair black 9mm safety eyes
black embroidery floss (nose)
needle for embroidery
yarn needle for joining components
stuffing
size E crochet hook
wire slicker brush (optional)

Fur texture is created by brushing finished pieces with a slicker brush (found in pet stores). Fur texture is similar to the halo of the yarn used. Most soft, glossy-finish acrylic yarns will fluff up nicely without stretching out the stitches.

Thursday, October 3, 2013

Now Available: Sitting Pretty Kitty

This crochet pattern is now for sale for $3.00 USD through Ravelry. Kitty is approximately 3.5" tall seated.
Materials
32 yards worsted weight yarn
1 pair 9mm cat eyes
embroidery floss (nose/mouth)
needle for embroidery
small amount stuffing
size E crochet hook
wire slicker brush (optional)

Fur texture is created by brushing finished pieces with a slicker brush (found in pet stores). Fur texture is similar to the halo of the yarn used. Most soft, glossy-finish acrylic yarns will fluff up nicely without stretching out the stitches.


*Fennec Fox is delayed, but still coming!* 

Saturday, August 31, 2013

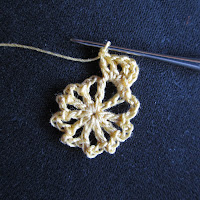
Lacy Star Flower Pattern Photo Tutorial


Pattern including chart here

Round 1:
magic loop
ch 6 (counts as dc and ch 3)
dc in lp


ch 3
[dc in lp, ch 3]8x
 slst in 3rd ch of beginning chain to join
Round 2:
slst to center of ch 3 sp
ch 4 (counts as tr)
in same lp work [tr, dc, dc]
 sc in nxt lp
[dc, dc, tr, tr, tr, dc, dc] in nxt lp
sc in nxt lp
[ [dc, dc, tr, tr, tr, dc, dc] in nxt lp, sc in nxt lp ]3x
in 1st lp work [dc, dc, tr]
slst to 4th ch of beginning chain to join

Lacy Star Flower Pattern

Photo Tutorial
Pattern on Ravelry
Abbreviation Key
Round 1: mglp, ch 6 (counts as dc and ch 3), [dc in lp, ch3]9x, slst to 3rd ch of beg chain to join

Round 2: slst to center of ch 3 lp, ch 4 (counts as tr), in same lp work [tr, dc, dc], sc in nxt lp, [ [dc, dc, tr, tr, tr, dc, dc] in nxt lp, sc in nxt lp]4x, [dc, dc, tr]in 1st lp, slst to 4th ch of beg chain to join.

Sunday, August 18, 2013

Tabby Stripes Tutorial

This tutorial is an accompaniment to my Tabby Cat pattern to assist with stripe placement.

Before
After


 Stripes are added using a fabric marker. Pick one that does NOT need heat to set the ink.

The most important part of the striping to get a recognizable tabby is to draw a "M" on the forehead. There are usually a few additional stripes parallel to the legs of the "M"


Many tabbies also have winged "eyeliner" that follows the edge of the nose, across the top of the eye, and around to the side of the head.

Color the remainder of the body with varying thicknesses of stripes. Most stripes will not go entirely around the body or leg. Stripes can be multiple colors.

Blended black and brown stripes

For sharply defined stripes, smooth fur flat and draw across the top with short strokes in the direction of the fur.


Black stripes only

For softer stripes, tipping, and shading, fluff the fur up and draw marker through the fluffed part. The marker should never touch the stitches themselves.


Note: Depending on the yarn and marker, some of the ink may come off. Be sure to let ink dry completely, then rub gently with a paper towel to check. Remove excess by rubbing parallel the to stripes. Rubbing perpendicular to the stripes may transfer ink to unmarked areas.

Sunday, August 11, 2013

Now Available: Labrador Puppy

This crochet pattern is now for sale for $4.00 USD through Ravelry. Puppy is approximately 5.5" tall when standing.
Materials
75 yards worsted weight yarn
1 pair 6mm cat eyes
embroidery floss (nose/mouth)
needle for embroidery
yarn needle
stuffing
size E crochet hook
wire slicker brush (optional)
fabric marker (optional)

Fur texture is created by brushing finished pieces with a slicker brush (found in pet stores). Most soft, glossy-finish acrylic yarns will fluff up nicely without stretching out the stitches.

Monday, July 29, 2013

Custom Cat Eye Tutorial

Most craft store cat eyes come in two colors: gold and green
Well, these "gold" eyes are more of an artificially flavored mac'n'cheese orange.

Solution: recolor them. Note: This only works on eyes with painted backs, not colored resin.

Step 1:
Gather materials:
  • Cat safety eyes
  • Assorted colors of permanent markers
  • Metallic permanent marker
  • Yarn needle
  • File or sandpaper
  • Paper towel


Step 2:
To remove the original paint, either file away the back of the eye or scrape the paint off with a needle with strokes radiating from the center. The eye on the left has had most of the paint scratched off with a needle. The eye on the right has been filed down. After filing, the eye can be scraped with a needle to add texture.


Step 3: 
Color the back of the eye with a permanent marker. I usually start with a light color. Let dry.


Step 4:
Lightly apply a second coat of a different color. Push the post of the eye through the paper towel and spin the eye against the surface of the towel. This rubs some of the wet ink off the ridges. Let dry.


Step 5:
If the background is a light color, stopping at step 4 is okay. However, the translucent marker ink is hard to see against dark colors. Apply one last coat of ink with a metallic permanent marker. Let dry

Done!

Monday, July 15, 2013

Now Available: Tabby Kitten

This crochet pattern is now for sale for $4.00 USD through Ravelry. Kitten is approximately 6" tall when standing.

Materials
90 yards worsted weight yarn
1 pair 6mm cat eyes
embroidery floss (nose/mouth)
needle for embroidery
stuffing
size E crochet hook
wire slicker brush (optional)
fabric marker (optional)

Fur texture is created by brushing finished pieces with a slicker brush (found in pet stores). Most soft, glossy-finish acrylic yarns will fluff up nicely without stretching out the stitches. If you choose to use a fabric marker to draw stripes, pick one that does not need heat to set the ink.

Sunday, July 14, 2013

Coming Soon: Tabby Kitten

This pattern will soon be available on Ravelry.


Cabbage Rose / Peony Crochet Pattern Photo Tutorial

The patterns for all three sizes of flower can be found here. Although these photos are for the medium flower, the same general technique is used for all sizes.

Opening Up (Medium)
 
ch4, hdc in 1st st

 [ch2, hdc in same st as above] 2x
[ch2, hdc in 1st lp] 2x


[ [ ch2, hdc] 2x in nxt lp ] 6x = 12 hdc worked


turn, [3dc,slst] in each ch2 sp


Work inner petals between hds worked in ch2 sp


slst in 1st st


Cabbage Rose / Peony Crochet Pattern


Unlike most crochet roses, these have NO SEWING! Instead, a base mesh is worked in a spiral from the center out, then petals are worked into the mesh from the outside in. 
Photo tutorial 
Pattern on Ravelry


Abbreviations (US Terminology)

ch = chain

dc = double crochet

hdc = half double crochet
lp = loop
nxt = next

slst = slip stitch
sp = space

st = stitch

[] #x = repeat stitches within brackets # times


Full Bloom (Large)

 ch4, hdc in 1st st
[ch2, hdc in same st as above] 2x

[ch2, hdc in 1st lp] 2x

[ [ch2, hdc ] 2x in next ch2 sp] 10x = 20 hdc worked

turn

[4dc, slst] in each ch2 sp between hdcs worked in sp

4dc, slst in 1st st


Opening Up (Medium)

ch4, hdc in 1st st
[ch2, hdc in same st as above] 2x

[ch2, hdc in 1st lp] 2x

[ [ ch2, hdc] 2x in nxt ch2 sp ] 6x = 12 hdc worked

turn

[3dc,slst] in each ch2 sp between hdcs worked in sp

slst in 1st st


Bud (small)

ch4, hdc in 1st st

[ch2, hdc in same st as above]2x

[ch2, hdc in 1st lp]2x

[ [ ch2, hdc] 2x in nxt ch2 sp] 3x = 6 hdc worked

turn

[3dc, slst] in nxt 7 ch2 sps
between hdcs worked in sp

[2hdc, slst] in nxt 4 ch2 sp between hdcs worked in sp

Outer petals should gently fold in around shorter inner petals.