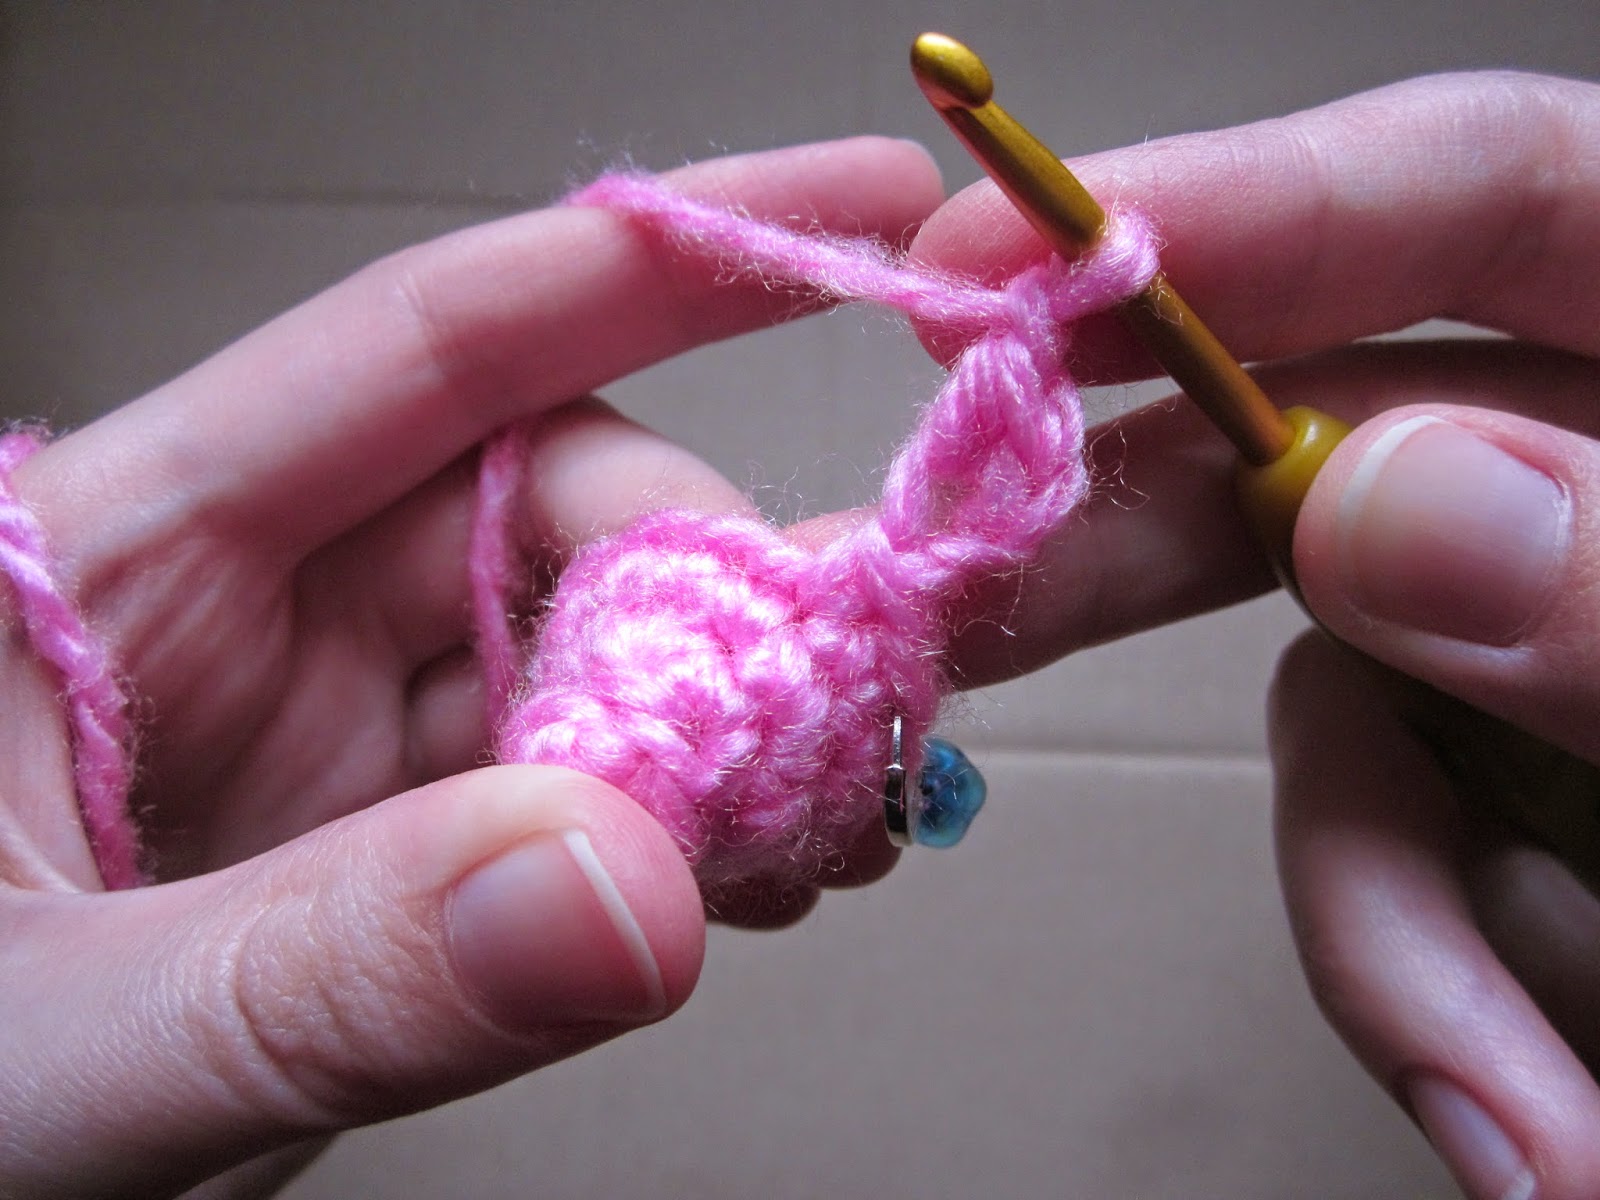
Loop stitch is exactly what it sounds like: a stitch that creates extra loops. This can be used to add texture to a project. There are several different versions of loop stitch, but this one seems simplest to me.
Note: Loops are formed on the back side of the work. So for the loops to be on the outside, you will have to work inside-out relative to most amigurumi.
The stitch is worked just like a sc, except we trap an extra loop of yarn on the back side of the work.
Here we have the start of a project in sc, and want to switch to loop stitch.
Insert your hook into the previous row as for a sc. Wrap the yarn up and around the back of something the size you want the resulting loop. This can be your finger, a pen, or in this case, the handle of another crochet hook. I like using a tool with a bit of grip so it doesn't slide out mid-stitch.
Grab the yarn on the far side of the tool with your hook.
Draw the loop on the hook through as for a sc.
Yo and draw through as if you were completing a sc. Note the tool is still holding the extra loop in place.
You have completed one loop stitch! You can now safely remove the tool from the extra loop. I prefer to do several stitches in a row before repositioning my tool, because the previous loop(s) holds it in place to more easily wrap the next stitch.
Here's what it looks like after two rounds of loop stitch. These are fairly small loops, only 1" in circumference. Note again that the loops are formed on the back side of the stitch, so this is inside-out relative to most amigurumi.
Showing posts with label crochet. Show all posts
Saturday, February 27, 2016
Tuesday, February 23, 2016
Tapestry Crochet Tutorial
Tapestry crochet is a great way to add colorwork to amigurumi without having to deal with extra ends.
Here we are a few stitches away from wanting to start a new color:
Bring the second strand in parallel to your working color, laying across the top of the stitches, and work a sc, inserting the hook under both loops and the extra strand.
The inactive color is now emerging from the side of the completed sc.
Continue in this manner carrying the inactive color along the top of the previous round. After several stitches, you may notice the inactive color showing through in front or back. A gentle tug to straighten out the strand being carried along will help. Don't pull too hard or it will act like a drawstring and pull in your stitches. It might still show a little on the back, but not at all on the front.
Now we want to use the inactive color. Color changes take place on the last stitch of the current working color. (So read ahead in your pattern!) Insert the hook, yo, and pull up a loop as you normally would for a sc. Note the color we are switching to is still carried along the top of the last round.
Here's the actual color change: pick up the color you want to switch to, and use it for the second yo and pull though of the sc.
You should now have a normal-looking sc in your first color, and the second color on the hook.
You're now working with your second color. Carry the inactive color along the top of the stitches, as you did before.
That's it! You can carry along more than one inactive color, but the more strands, the taller your stitches will be to cover them, so it may start to affect the aspect ratio of the stitches.
Here we are a few stitches away from wanting to start a new color:
The inactive color is now emerging from the side of the completed sc.
Continue in this manner carrying the inactive color along the top of the previous round. After several stitches, you may notice the inactive color showing through in front or back. A gentle tug to straighten out the strand being carried along will help. Don't pull too hard or it will act like a drawstring and pull in your stitches. It might still show a little on the back, but not at all on the front.
Now we want to use the inactive color. Color changes take place on the last stitch of the current working color. (So read ahead in your pattern!) Insert the hook, yo, and pull up a loop as you normally would for a sc. Note the color we are switching to is still carried along the top of the last round.
Here's the actual color change: pick up the color you want to switch to, and use it for the second yo and pull though of the sc.
You should now have a normal-looking sc in your first color, and the second color on the hook.
You're now working with your second color. Carry the inactive color along the top of the stitches, as you did before.
That's it! You can carry along more than one inactive color, but the more strands, the taller your stitches will be to cover them, so it may start to affect the aspect ratio of the stitches.
Tuesday, January 12, 2016
Clone Your Cat Head Shaping: A Photo Tutorial
This photo tutorial accompanies the instructions found after round 6 of the head of my Clone Your Cat pattern. (Currently in testing) Now available!
After round 6, you should have a cup shape. Remember it should be inside out relative to most amigurumi, with the more ridged side in.
Start threading your 8" length of yarn through the inner loops, up through the middle of the stitch, counterclockwise around the circle. With a contrasting yarn as shown here, you get a striped candy cane effect. I'm using pink here so it's easy to see.
Pull both ends out about 1.5" and tie a knot, leaving a 5" circumference ring that won't stretch out. Here I took a picture of the final version, using the same yarn as the rest of the body.
The ring should lay smoothly along the inner loops, so you can work round 7 normally, inserting the hook under both loops and the retaining ring.
After round 6, you should have a cup shape. Remember it should be inside out relative to most amigurumi, with the more ridged side in.
Pull both ends out about 1.5" and tie a knot, leaving a 5" circumference ring that won't stretch out. Here I took a picture of the final version, using the same yarn as the rest of the body.
The ring should lay smoothly along the inner loops, so you can work round 7 normally, inserting the hook under both loops and the retaining ring.
Sunday, September 28, 2014
Sir Francis the Pig's Ears: A Photo Tutorial
I've gotten a few questions regarding the ears on Sir Francis the Pig. The pattern will be edited when the testing period is over to clarify a few things.
At the end of round 4, you should have something like this:
Start round 5 with sc, ch 2. The stitch marker is in the last stitch of round 4.
Now sc in the 2nd stitch from the hook, which is the first chain stitch.
hdc in the same stitch as the sc you just made
ch 1
slst in the top of the hdc
hdc and sc in the same stitch as the first sc and hdc
skip one stitch of round 4, indicated by the green arrow
3 sc across the forehead. After the first sc, if you pull the ear away from the body you can see the skipped stitch
make a second ear just like the first: ch 2, [sc, hdc, ch 1, slst in top of hdc, hdc, sc] in 2nd st from hook. Skip the next stitch as you did with the first ear, then make 6 sc.
You have now completed round 5.
In round 6, treat the two skipped stitches as part of round 5. Pull the ear outwards and towards the snout to work the stitch behind the ear, so the ears end up on the outside of the body.
At the end of round 4, you should have something like this:
Start round 5 with sc, ch 2. The stitch marker is in the last stitch of round 4.
hdc in the same stitch as the sc you just made
ch 1
hdc and sc in the same stitch as the first sc and hdc
skip one stitch of round 4, indicated by the green arrow
3 sc across the forehead. After the first sc, if you pull the ear away from the body you can see the skipped stitch
make a second ear just like the first: ch 2, [sc, hdc, ch 1, slst in top of hdc, hdc, sc] in 2nd st from hook. Skip the next stitch as you did with the first ear, then make 6 sc.
You have now completed round 5.
In round 6, treat the two skipped stitches as part of round 5. Pull the ear outwards and towards the snout to work the stitch behind the ear, so the ears end up on the outside of the body.
Friday, February 21, 2014
Now Available: Hops the Bunny Rabbit
| Pattern is now available for free via Ravelry |
Materials & Tools
15 yards worsted weight yarn
small amount yarn for tail
1 pair black 9mm safety eyes
black embroidery floss (nose/mouth)
needle for embroidery
stuffing
size E crochet hook
wire slicker brush (optional)
Tail tutorial
Now Available: Heart Mesh Bag
| This pattern is now available for $4.00 USD via Ravelry |
This bag has a stretchy mesh body sprinkled with an abundance of
cheery hearts combined with a solid bottom to help keep smaller items
from slipping out. Due to the short pattern repeat, this bag is easily
re-sized to fit your needs.
Gauge does not need to be precise, mesh is very stretchy.
Includes full written instructions plus basic charts for the mesh portion.
Gauge does not need to be precise, mesh is very stretchy.
Includes full written instructions plus basic charts for the mesh portion.
Sunday, January 19, 2014
January Doldrums Promotion
For the remainder of January get Sitting Pretty Kitty free with the coupon code BONUSKITTY and the purchase of any other pattern in the Ravelry shop. Ends midnight Jan 31 CST.

These little kittens fit in the palm of your hand. At 32 yards each, they are perfect for using up those awkwardly sized balls left over from previous projects.
Saturday, October 12, 2013
Now Available: Fennec Fox
| This pattern is now for sale for $5.00 USD through Ravelry. |
Materials & Tools
125 yards worsted weight yarn
1 pair black 9mm safety eyes
black embroidery floss (nose)
needle for embroidery
yarn needle for joining components
stuffing
size E crochet hook
wire slicker brush (optional)
Fur texture is created by brushing finished pieces with a slicker brush (found in pet stores). Fur texture is similar to the halo of the yarn used. Most soft, glossy-finish acrylic yarns will fluff up nicely without stretching out the stitches.
125 yards worsted weight yarn
1 pair black 9mm safety eyes
black embroidery floss (nose)
needle for embroidery
yarn needle for joining components
stuffing
size E crochet hook
wire slicker brush (optional)
Fur texture is created by brushing finished pieces with a slicker brush (found in pet stores). Fur texture is similar to the halo of the yarn used. Most soft, glossy-finish acrylic yarns will fluff up nicely without stretching out the stitches.
Thursday, October 3, 2013
Now Available: Sitting Pretty Kitty
| This crochet pattern is now for sale for $3.00 USD through Ravelry. Kitty is approximately 3.5" tall seated. |
Materials
32 yards worsted weight yarn
1 pair 9mm cat eyes
embroidery floss (nose/mouth)
needle for embroidery
small amount stuffing
size E crochet hook
wire slicker brush (optional)
Fur texture is created by brushing finished pieces with a slicker brush (found in pet stores). Fur texture is similar to the halo of the yarn used. Most soft, glossy-finish acrylic yarns will fluff up nicely without stretching out the stitches.
*Fennec Fox is delayed, but still coming!*
32 yards worsted weight yarn
1 pair 9mm cat eyes
embroidery floss (nose/mouth)
needle for embroidery
small amount stuffing
size E crochet hook
wire slicker brush (optional)
Fur texture is created by brushing finished pieces with a slicker brush (found in pet stores). Fur texture is similar to the halo of the yarn used. Most soft, glossy-finish acrylic yarns will fluff up nicely without stretching out the stitches.
*Fennec Fox is delayed, but still coming!*
Saturday, August 31, 2013
Lacy Star Flower Pattern Photo Tutorial

Pattern including chart here
Round 1:
magic loop
ch 6 (counts as dc and ch 3)
dc in lp
ch 3
[dc in lp, ch 3]8x
slst in 3rd ch of beginning chain to join
Round 2:
slst to center of ch 3 sp
ch 4 (counts as tr)
in same lp work [tr, dc, dc]
sc in nxt lp
[dc, dc, tr, tr, tr, dc, dc] in nxt lp
sc in nxt lp
[ [dc, dc, tr, tr, tr, dc, dc] in nxt lp, sc in nxt lp ]3x
in 1st lp work [dc, dc, tr]
slst to 4th ch of beginning chain to join
Lacy Star Flower Pattern
Photo Tutorial
Pattern on Ravelry
Abbreviation Key
Pattern on Ravelry
Abbreviation Key
Round
1: mglp, ch 6 (counts as dc and ch 3), [dc in
lp, ch3]9x, slst to 3rd
ch of beg chain to join
Round
2: slst to center of ch 3 lp,
ch 4 (counts as tr), in same lp work [tr, dc, dc], sc in nxt lp, [
[dc, dc, tr, tr, tr, dc, dc] in nxt lp, sc in nxt lp]4x, [dc, dc,
tr]in 1st
lp, slst to 4th
ch of beg chain to join.
Subscribe to:
Posts (Atom)